Anyway, I asked which markers people were using to create headers like the one in the image above. Since I worked in Information Technology as a technical writer and web designer for many years, and with not a very good budget that would I allow me to get fancy tools like Photoshop, I had to learn to make-do with whichever tool my employers would authorize me to use. In other words, I was always reduced to use whichever Microsoft application my assigned computer would have. Since there is so much you can do with an application like Paintbrush, you have to become creative in other ways besides artful. As I posted the picture above on a conversation in the Bullet Journal Junkies group to be clear about what I was talking about, questions came up as of how to create that image. I can see why: People can print those out and trace them on their journals instead of having to create them from scratch. I thought that I could share how I created that image. You will need the following:
It takes three steps and an optional four, as follows,
Download and Install FontYou can always use any font that came pre-installed with your computer. But if you can't find one that appeals to you, you can download them from the Internet. There are many sites offering free fonts. Just be careful when downloading something from the Internet if you are not sure about the source or providers. Many things that are supposed to be free may come with strings attached. In doubt, run the other way. Otherwise, do your homework, check the site, make sure you have your antivirus running, and go ahead.
Create Background Header Layer |


|  Figure 2 - Text Box - Example |

|  |
|  Figure 4 - Both Layers - Example 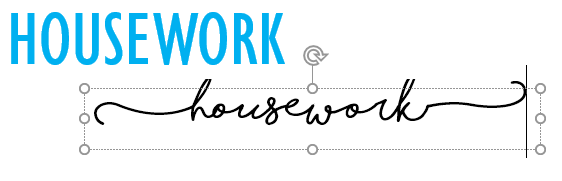 Figure 5 - Front Layer with Added Curls - Example  Figure 6 - Final Result - Example |

Creating a Reusable Image from your Header
 Not everybody knows there is a nifty tool that comes on all Windows-based computer. It is called Snipping Tool and it allows you to snip almost anything on the screen. It can usually be found on the Windows Start Menu. If you cannot find it on your Start menu, look for it in the Accessories menu. ([Start] > Accessories > Snipping Tool) For more in-depth instructions on how to use this screen-capturing tool, see Use snipping tool to capture screenshots in the Microsoft support center. Using the Snipping Tool, you can create a .PNG, .JPG, or .GIF file that you can use and reuse as many times as you want. Final WordsI hope you enjoyed this blog entry. Once again, I do not endorse Dafont.com, Microsoft, or any of their products. Those are just the tools I use on a frequent basis because they are readily available to me and they work for me. I am not responsible for any technical problems you may encounter while trying to replicate the steps herein. |  Figure 7 - Example of Windows Start Menu Showing And Where To Find The Snipping Tool |
By the way, for those of you who are crafty and creative enough to do this by hand, please feel free to share your tools of the trade in the comments section. Thank you in advance!
Enjoy and happy journaling!!!
Leave a Reply.
Author
Mother, daughter, wife, full-time project manager, semi-pro photographer, certified Spanish translator, and even self-taught plumber and electrician when needed. Yes, you will see me more frequently at Lowe's than at any other store.
Archives
February 2017
January 2017
December 2016
November 2016
October 2016
September 2016
August 2016
July 2016
June 2016
May 2016
Categories
All
Babies
Banners
Children
Collection Idea
Daily
Digital
Doodles
Doodles And Drawings
Expenses
Fitbit
Fitness
General
Goals
Habit Tracker
Headers
Health
Logs And Trackers
Monthly
Newborns
New Mom
Professional
Tasks
Trackers
Weekly
Work
Yearly
 RSS Feed
